
Posted on — Leave a comment

How to Make a DIY Christmas Wreath (Step-by-Step for Beginners)

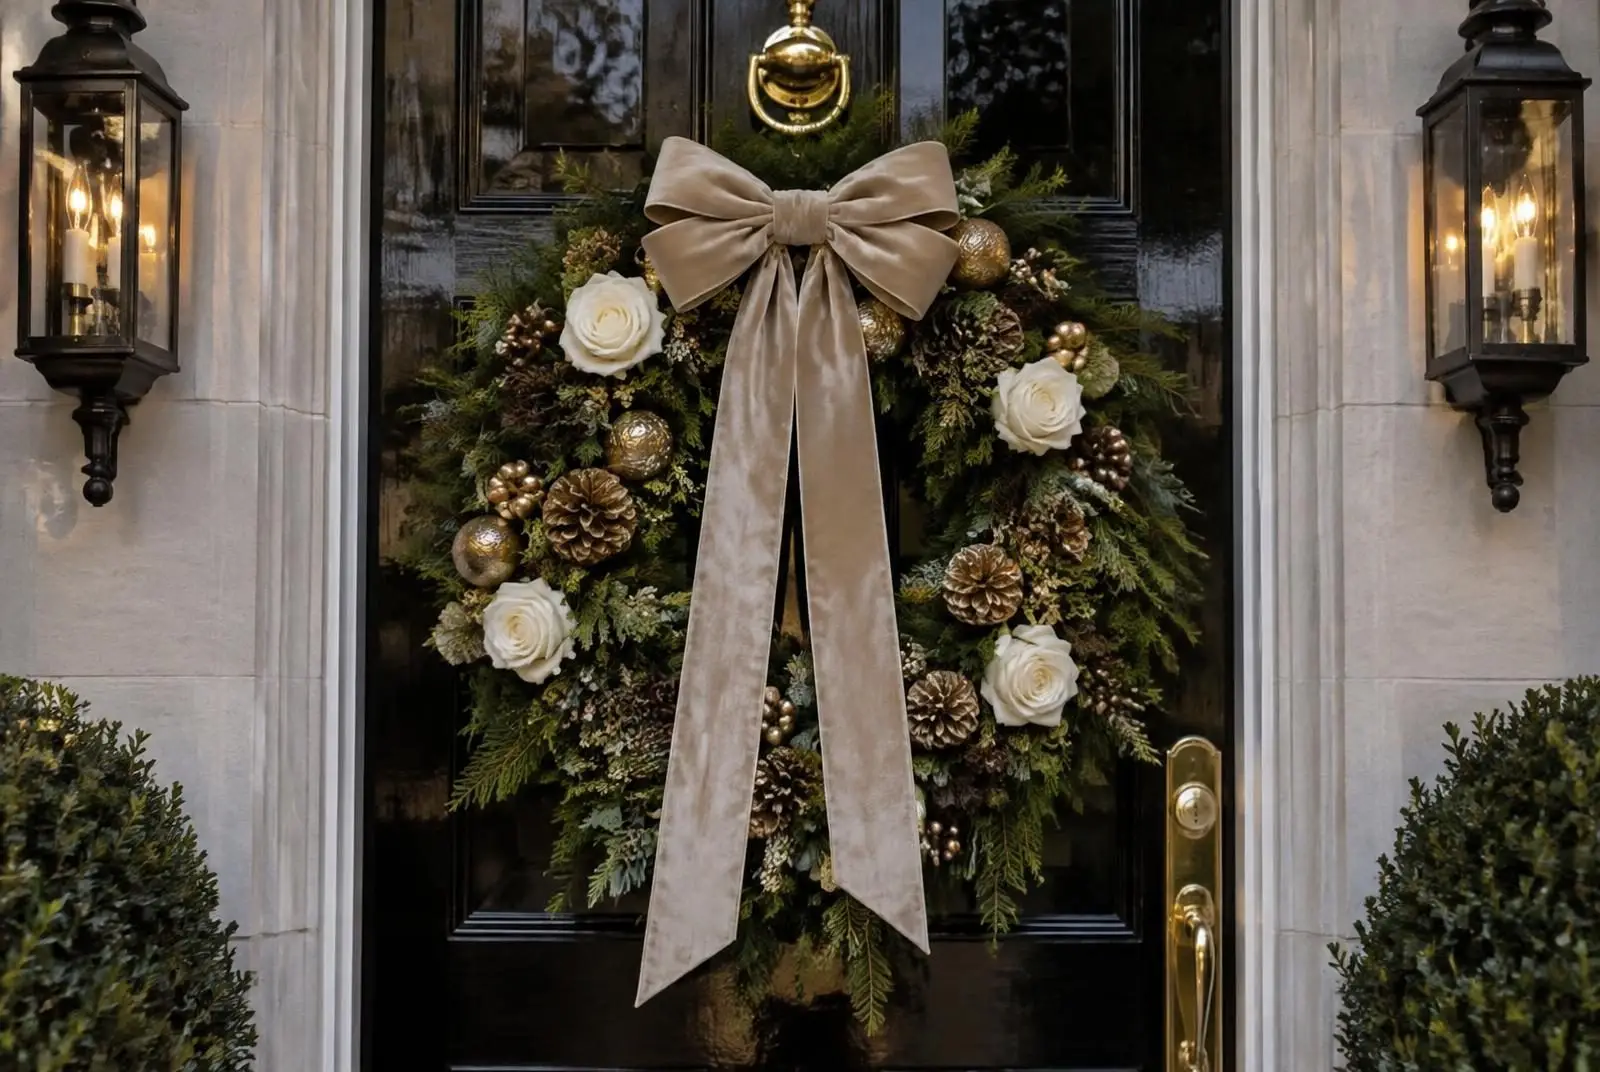
Luxury handmade Christmas wreath with white roses and velvet bow on a black front door

A plain artificial greenery wreath is a useful starting point for your first DIY Christmas wreath. Its existing branches provide coverage, so you can focus on arranging a bow, floral picks and a few accents. This guide uses removable ties to make adjustments easier and let you change the decoration next season.

Choose a base that fits your door

Measure the space where the finished wreath will hang, including room for the door to open and any storm door to close. The finished wreath may extend beyond the base once you add stems and ribbon. Check both diameter and depth before choosing your materials.

A wire frame or grapevine base needs a different building method and may require considerably more greenery. For this project, use an artificial wreath with enough existing foliage to hide attachment points.

Supplies checklist

  • One plain artificial greenery wreath.
  • Decorative picks or stems in two or three coordinating textures.
  • Ribbon for a bow and tails; wired ribbon is easier to shape.
  • Soft craft ties or floral wire, plus appropriate cutters.
  • Fabric scissors, a protective work surface and a compatible wreath hanger.

Choose materials for the actual display location. A covered porch still receives humidity, wind and some moisture. Do not assume a faux stem, glitter finish or ribbon is outdoor suitable unless the manufacturer says so. Indoor materials are best kept indoors.

Plan your arrangement before attaching anything

Lay the wreath flat and choose one focal point: lower left, lower right or bottom center. Position the bow there temporarily, then arrange your largest picks around it. Let stems follow the curve of the wreath rather than point straight outward in every direction.

Take a quick phone photo of the loose layout. It gives you a reference while you secure the pieces. Start with fewer accents than you think you need; you can add more after viewing the wreath upright.

Step 1: Shape the greenery

Separate compressed branches gently and spread their tips to cover gaps. Turn the wreath as you work so one area does not become much fuller than another. Identify a firm structural part of the base for the hanging point, following the base manufacturer’s directions.

Step 2: Attach the largest picks

  1. Place your first pick beside the planned bow position, with the stem following the base.
  2. Fasten its stem to the wreath’s structure at more than one point if needed to prevent rotation.
  3. Keep cut wire ends turned inward and away from hands, the door and painted surfaces.
  4. Add another pick facing along the opposite side of the focal point.
  5. Cover visible ties with existing greenery.

Check that each attachment grips securely without crushing delicate stems. Do not rely on a decorative branch tip to support a heavy accent.

Step 3: Add smaller accents

Use berries, smaller florals or pinecone stems to connect the main pieces. Repeat a color in a few places so the wreath feels coordinated. Leave open greenery between clusters if you prefer an airy design. A fuller design needs more coverage, but it should still leave the bow and main accents easy to see.

Step 4: Make a simple loop bow

  1. Leave a tail, then fold the ribbon back on itself to make the first loop.
  2. Pinch the ribbon at the center and make a matching loop on the other side.
  3. Add another pair of loops if you want a fuller bow, keeping the center pinched.
  4. Secure the center with a soft tie or floral wire, then leave a second tail and cut the ribbon.
  5. Separate and shape the loops. Trim tails only after testing the bow on the wreath.

For one-sided ribbon, turn it at the pinched center as needed to keep the decorative face visible. Practice with an offcut first. Calculate ribbon from your test bow instead of assuming a fixed length fits every bow size.

Step 5: Attach and test upright

Fasten the bow to the structure of the wreath, conceal the tie and arrange its tails around the picks. Hang the wreath temporarily and check it from a few steps away. Secure any shifting pieces, then confirm that the hanger is suitable for the door and finished weight.

Troubleshooting

  • The wreath leans: distribute heavy accents more evenly and check the hanging point.
  • The bow disappears: bring it forward or reduce nearby stems.
  • Ties show: redirect existing greenery over them.
  • The door will not close: reduce depth or choose another display spot; do not force the door against decorations.
  • Pieces move: add a second attachment to the supporting base.

Store it for another season

Remove the wreath carefully, check for loose ties and let it dry fully if exposed to moisture. Store it without crushing the bow. Removable accents can be packed separately and labeled so the arrangement is easy to recreate.

Keep decorating: tree ribbon techniques · beginner wreath tutorial · step-by-step tree decorating.

Plan your wreath project

Browse Christmas wreaths, floral picks and stems, ribbon and bows and DIY supplies. Read the individual listings for sizes, quantities and indoor or outdoor suitability.


Posted on — Leave a comment

How to Put Ribbon on a Christmas Tree: 4 Designer Techniques

Champagne velvet ribbon cascading through a Christmas tree with gold ornaments

Ribbon gives a Christmas tree movement, color and texture. The easiest place to start is one small section: shape a few loops, step back, and repeat the effect you like. You do not need to wrap an entire roll around the tree to get a finished look.

Choose ribbon for the look you want

Wired ribbon is useful for rounded loops because its edges can be shaped. Unwired ribbon can work for soft drapes, narrow streamers or bows; it simply behaves differently. Check each product description for wired edges, width and roll length rather than assuming every decorating ribbon is wired.

For a traditional palette, try red with gold. Champagne and ivory create a softer look, while tartan adds pattern. If you combine two ribbons, let one carry the pattern and use a quieter color for the second.

Gather your supplies

  • Your chosen ribbon, with its width and length noted.
  • Scissors suitable for fabric and small, soft decorative ties.
  • A stable step stool if needed to reach the upper branches.
  • A place to keep offcuts for bows or small accents.

Estimate ribbon before cutting a whole roll

Tree height alone does not tell you how much ribbon you need. Width, fullness, visible sides and the size of your loops all matter. A tree against a wall may need less decoration at the back than a tree viewed from every side.

  1. Choose a ribbon technique below and decorate one representative section.
  2. Measure how much ribbon that section uses.
  3. Count how many similar sections you want across the visible tree.
  4. Multiply the sample length by the number of sections. Allow extra for tails, ties and adjustments.

For example, a test section using one yard repeated in twelve places needs about twelve yards before that extra allowance. This is a planning example, not a promise for every tree. Divide your planned total by the length per roll to work out how many rolls to buy.

Prepare the tree first

Set up the tree, shape its branches and check the lights before adding ribbon. Put ribbon in before most ornaments so you can reach into the branches. Turn off and unplug electrical decorations before adjusting them. Secure ribbon to branches, keeping ties away from wiring and light sockets.

1. Tucked ribbon sections: a manageable first project

  1. Leave the ribbon attached to the roll while you test a short section.
  2. Tuck the end into the greenery and secure it gently to a branch if needed.
  3. Bring the ribbon forward in a soft curve, then tuck it back into another branch.
  4. Make a second curve in a slightly different direction. Shape the edges without flattening the middle.
  5. Once you like the size, cut the section and hide its end. Repeat elsewhere, varying the placement rather than making identical rows.

Short sections are easy to move. If one area looks crowded, shift a single piece instead of unwinding the whole tree.

2. Cascading ribbon: soft vertical movement

Secure a strip near the top to a supporting branch. Let it travel downward, catching it in the greenery at intervals to create loose curves. Follow the tree’s widening shape as you descend. Begin with one cascade, then add others where they balance the view. Avoid pulling the ribbon straight and tight.

3. A diagonal wrap: a continuous path

Work from the upper branches downward in a relaxed spiral. Tuck the ribbon into the tree periodically so it has depth instead of sitting entirely on the outside. Leave space between passes for ornaments and greenery. A loose, open wrap is easier to adjust than a tight band.

4. Layered ribbon: combine texture and pattern

Place a narrower ribbon over a wider one, then treat the pair as a single section. Test whether they bend comfortably together before repeating the combination. If one slips behind the other, secure them together at the hidden tuck points. You can also alternate two ribbons in separate sections for a lighter effect.

Fix common ribbon problems

  • Flat loops: loosen the tuck points and gently curve the wired edges.
  • Visible cut ends: tuck them farther into the greenery or cover them with an ornament.
  • Slipping sections: use a soft tie on a supporting branch rather than tightening ribbon against lights.
  • Too much ribbon: remove a few sections and leave more greenery visible.
  • Uneven color: view the tree from the room’s entrance and move a few sections before adding more.

Finish with ornaments

Add ornaments around the ribbon, leaving its curves visible. Keep your favorite ornaments where they can be seen, and save ribbon offcuts for small bows or gift wrapping.

Keep decorating: tree ribbon techniques · beginner wreath tutorial · step-by-step tree decorating.

Find your decorating supplies

Explore Christmas ribbon and bows, ornaments and Christmas trees. Check each item’s dimensions, materials and variation options before ordering.

Posted on — Leave a comment

DIY Holiday Craft Projects That Add a Touch of Sophistication

Elegant Wreaths with Premium Ribbons

Create a statement piece for your front door using luxury craft supplies from Everything Christmas.

Materials
– Fresh evergreen garland (2 ft)
– Velvet ribbon in deep burgundy (1 yd)
– Gold-plated pine cones (6‑8)
– Silk berries (4)

Steps
1. Wrap the ribbon tightly around the garland, securing each coil with a discreet hot‑glue dot.
2. Attach pine cones evenly spaced along the base, pressing gently into the ribbon.
3. Nestle the silk berries between the cones for a pop of color.
4. Finish with a satin bow at the top for a polished look.

Hand‑Painted Glass Ornaments

Add a personal touch to your tree with handmade ornaments that look museum‑ready.

Materials
– Clear glass baubles (12 oz)
– Metallic acrylic paints (silver, rose gold)
– Fine‑tip brush set
– Glitter dust (optional)

Steps
1. Clean the bauble surface with a lint‑free cloth.
2. Using the fine‑tip brush, paint delicate snowflake patterns in silver.
3. Allow the paint to dry 15 minutes, then add a thin rose‑gold accent line.
4. Sprinkle a pinch of glitter dust for subtle sparkle, then seal with a clear spray.

Sophisticated Table Centerpiece

Transform your holiday dining table with a refined DIY centerpiece that blends natural elements and upscale textures.

  • Base: Black marble slab (12 in × 12 in)
  • Accents: White candles, crystal beads, and a sprig of rosemary
  • Finish: A loop of premium satin ribbon tied around the slab

Instructions
1. Arrange the candles in a triangular formation on the marble.
2. Scatter crystal beads around the candles for reflective light.
3. Place the rosemary sprig diagonally across the arrangement.
4. Wrap the satin ribbon around the slab, knotting it at the back for a clean finish.

These projects prove that handcrafted décor can be both luxurious and approachable. With premium supplies from Everything Christmas, your holiday home will exude sophistication without the hassle of store‑bought décor. Happy crafting!